

Getting started with My Financial Life
From installing the app to your first imported statement and budget — about ten minutes. Everything stays on your own PC the whole way through.
1. Install it
My Financial Life 1.0.0 is a Windows 11 app (version 22H2 or later, on x64 or ARM64 PCs), sold as a one-time purchase through the Microsoft Store. There is no subscription, no account of ours to create and no licence key: the Store handles the purchase and installs it like any other app, then keeps it up to date.
Once it is installed, open My Financial Life from the Start menu. Later, Settings ▸ About ▸ Check for updates takes you to the app’s Store page.
2. The welcome page
The first time it opens, the app shows a welcome page with three choices:
- Explore with sample data — a year of invented accounts, budgets and investments, in a file of its own. Change anything you like; opening the sample again resets it. It is a good way to see every screen with something in it before you type anything of your own. An amber bar reminds you that you are in the sample, with Open my own file… and Reset the sample buttons.
- Create a new file — start your own. It begins with one current account; you add the rest, or import a statement.
- Open a file… — a
.mflfile you already have on this PC.
Files you have used recently are listed underneath. After that, the app reopens the last
file you used each time it starts. You can also double-click a .mfl file in
File Explorer, or right-click the taskbar icon for recent files.
3. Where your file lives
Everything you enter goes into a single .mfl file, and changes save as you
make them — there is no Save button to forget. When you create a new file the app
suggests Documents\My Financial Life, but you can keep it anywhere you like.
It is your file: copy it, back it up or move it like any other document.
Settings ▸ Your data shows where it is, with Show in File Explorer
and Save a copy….
Cloud folders are allowed. If the file is in OneDrive, Google Drive, Dropbox or iCloud Drive, it opens normally. The first time, the app explains once that a sync service can copy the file mid-save, and that two computers editing it at the same time can lose changes — and suggests a folder on this PC instead. The choice is yours; the app keeps its own backups of that file on this PC either way.
The file is not encrypted by the app. It is protected the way your other documents are: by your Windows sign-in, and by BitLocker or Device Encryption if you have it turned on. If you want a lock on the app itself, turn on Windows Hello in Settings ▸ Safety and privacy.
4. Add your accounts
Use + beside Accounts in the sidebar to add current accounts, savings, credit cards, investments, pensions, property, vehicles, loans and mortgages, and drag them into folders you choose. Today and Projected switch the balances between now and after scheduled bills are paid.
The register works like a spreadsheet: type straight in, and payees and categories complete as you type. Splits and transfers between accounts are built in.
5. Import a statement
My Financial Life does not connect to your bank. Instead, download a statement from your bank’s website — OFX, QFX, QIF or CSV — and choose Import on Home or File ▸ Import… (or drop the file onto the window). For a CSV you tell the app which column is which, once.
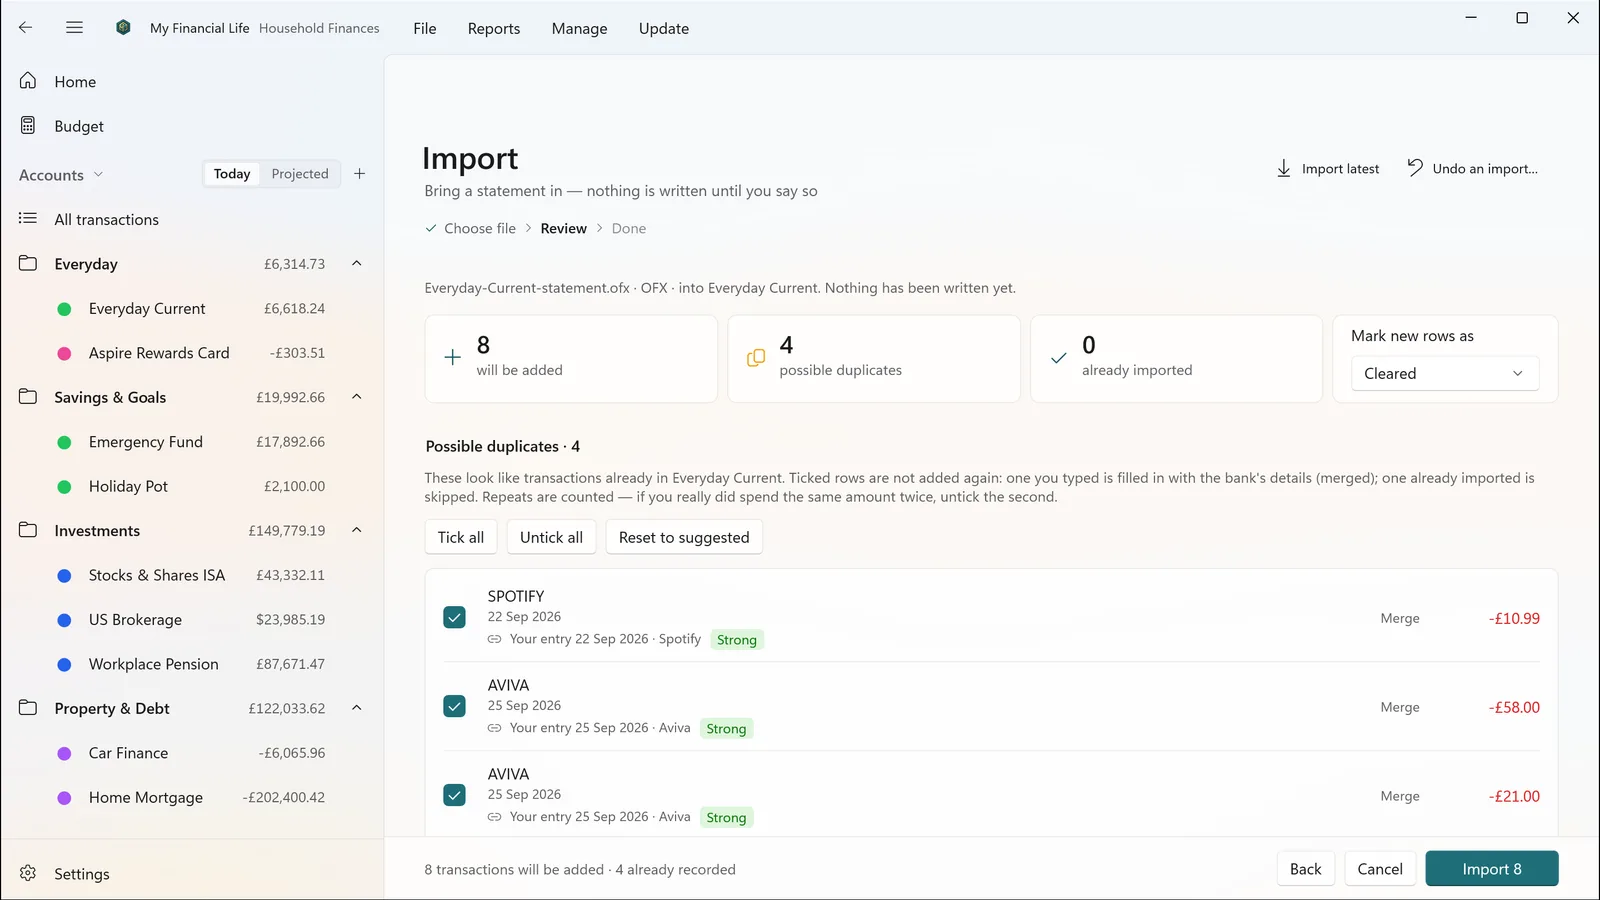
Transactions you already typed in are spotted and matched, duplicates are flagged, and rules file payees and categories for you next time. If you change your mind, Undo import takes the whole thing back out.
6. Set up a budget
Open Budget in the sidebar to plan by month or across the year. Add goals for saving or paying down a debt, and watch the burn-down chart to see whether you are on track for the rest of the month. Click any figure to see the transactions behind it; a budget line can become a scheduled bill.
7. Investments and prices
Record buys, sells, dividends, reinvested dividends, share transfers and stock splits in an investment account, and the app works out holdings with their purchase lots, cost basis, gains, money-weighted returns and income.
Prices and exchange rates can be entered by hand, or updated automatically with your own free keys from Tiingo (prices) and Open Exchange Rates (exchange rates). Those requests carry only ticker symbols or currency codes and your key — never your holdings or transactions — and the keys are kept in Windows’ own credential store, not in your file. Without keys, the app never goes online. The privacy policy has the details.
8. Snapshots and backups
While you work, the app takes automatic snapshots of your file — when it opens, every so often while it changes, and when it closes. File ▸ Snapshots and saved copies… lets you restore one (the app takes a safety snapshot of the current state first, so a restore can be undone) or keep a named copy.
Snapshots and saved copies live in the app’s own folder in your local app data, not next to
your file. Uninstalling the app removes that folder, along with the
sample data and your settings — but never your .mfl file. So snapshots are a
safety net, not a backup: keep your own backups of the file itself, the way you would any
important document.
Before a newer version of the app upgrades a file’s format, it saves a backup copy in a
Backups folder beside the file (or in the app’s own folder, for a file in a
cloud folder).
9. Where to next
The Reports menu is a good place to start: Net Worth, Cash Flow, Income & Expense and Category & Payee answer most questions, and every figure opens the transactions behind it. Save the ones you want again. If you keep a loan or mortgage in the app, the Loans page shows the payment schedule and when it ends.
The features page lists everything else.
Questions the docs don’t answer? Email support@garelochsoft.com — a real person reads every message. See also the support page.